Note: I am not a professional and do not claim to be an expert. Please be sure to always read instructions for all tools and products. Safety is very important and should be your top priority. Wear necessary protection when using tools (eye wear, hearing protection, gloves, etc.) and dust masks when sanding or cutting. Sarah Flips It is not responsible for any injury or damage. All of my designs are not professionally designed and are for private use only.
Create a beginner-friendly DIY kitchenette for your home! This project is perfect for a basement, accessory apartment, or as your main kitchen in a small space. Learn how to build yours step-by-step!
Table of Contents

My husband Justin and I always knew we wanted our place to be the hang-out house when the kids get older — the spot where their friends feel comfortable, independent, and happy to spend time. And honestly, having a fun entertaining area for us didn’t hurt either. So we decided to build a little kitchenette/hangout zone in the house… despite the fact that I had exactly zero plumbing experience and had never taken on a project like this before.
A sink? Yes. An extra fridge? Absolutely. The rest? Time to start researching.
Supplies for DIY KITCHENETTE
Tools:
Materials:
- Cabinets
- Countertop
- Sink
- Faucet
- MusselBound Adhesive
- Tile for backsplash
- Tile edge trim
- Toe kick trim for cabinet base
- Lattice trim for edges of cabinets
- Grout
- Grout bags
- Sponges
- 1×4 solid white oak for shelf
- Knobs
- Pulls
- Construction screws
How to CREATE A DIY KITCHENETTE
1. CUT OUT LVP Flooring
If you’ve got LVP flooring over cement, the first thing you’re supposed to do is cut out the section where the cabinets will go. LVP expands and contracts with temperature changes, so you don’t want cabinets trapping it. I cut out the flooring just in the cabinet zone so everything could move the way it was supposed to.
2. Map Out the Layout
Before buying anything, I sketched out a rough layout. Everyone’s space is different, so I would recommend measuring the length of your space and going from there. Then decide what cabinet features are most important to you: drawers? Cupboards? A hidden trash can? I’m a drawer person, so I went heavy on those. I also made sure I’d have space for the fridge on the left and a little table nook on the right.
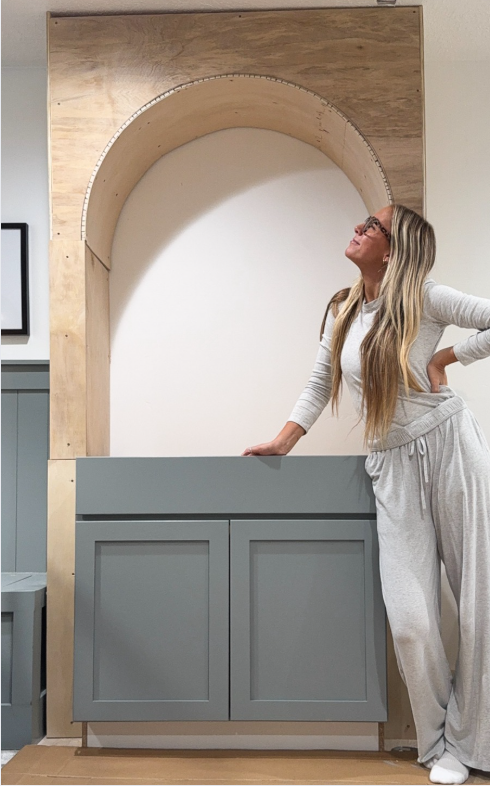
3. Step 3: Choose (and Assemble) Your Base Cabinets
I did a lot of cabinet research since I’ve found that price and quality can vary wildly. I’ve bought cabinets from Home Depot before that I was super disappointed in. Luckily I found these Home Depot Avondale by Hampton Bay cabinets, which are part of their premium line — and honestly, they were 100% worth it. Soft-close, super sturdy, great finish. I genuinely can’t tell the difference between these and custom-built ones.
Assembly was surprisingly easy. It was basically just like screwing a box together! If you need step-by-step instructions, this video may be helpful.
4. Level Everything
No home has a perfectly level floor or perfectly straight walls, so a laser level and shims are your best friend. I used scrap-wood shims from Home Depot and tucked them under or behind the cabinets until they were perfectly level. Once everything was level, I anchored the cabinets to the studs with multiple screws per stud so they were not going anywhere. (If you don’t have a stud finder you love, get this one — truly an unsung hero of this project.)

5. Install the Countertop
You can go the traditional countertop-company route, or do what I did: hit up a stone supplier’s scrapyard. They often have leftover pieces of marble or quartz for a fraction of the usual cost. I picked a scrap I liked, and they actually came out, measured, custom cut it, and installed it for me. It saved me a ton of money, and still looks amazing!

6. Assemble the Upper Cabinets
Installing upper cabinets is way easier with two people, but if you’re working solo, a 2×4 can be a lifesaver. First, use a stud finder to locate and mark your studs. Then draw a line where you want the bottom of the cabinet to sit—definitely use a laser level for this.
Screw a 2×4 into the studs along that line to act as a temporary support (drill pilot holes first so the wood doesn’t split). You can rest the cabinet right on the 2×4 while you drill it into the wall. Since the 2×4 is already attached to the studs, those screws show you exactly where to secure the cabinet.
Once the cabinet is up, remove the 2×4 and fill the holes—or just cover them with tile like I did.

7. Backsplash Time
Once the uppers were in, I tackled the tile. I used MusselBound instead of mortar — it’s basically an aggressive double-sided tape. The tiles I chose were natural-cut and imperfect, so perfectly straight lines weren’t the goal anyway. They rest right on the countertop, which makes lining everything up easier.

8. Install the Sink & Tackle the Plumbing
Before the countertop guys cut the slab, I told them which faucet I was planning to install (two-hole vs. three-hole matters!). I installed the sink after doing the backsplash — trying to tile around a sink would have been tricky.
For the plumbing, I watched a bunch of YouTube videos, took a deep breath, and went for it. Turns out, with the right parts and some patience, it’s totally doable.

CUSTOMIZATION iDEAS
- Install gold hardware and faucet for an instant upgrade
- Use glass vases, ceramic bowls, and simple artwork to complete the look
- Add appliances like a full-size refrigerator and microwave
Final Thoughts
This DIY kitchenette is a fantastic way to get a stylish, durable, and custom-looking kitchen space without spending a fortune. Whether you’re using it for a basement hang-out spot, accessory apartment, or as your main kitchen, it will serve you well for years to come. Happy building!!